# Starting out

## Step 0 - Some info you need to know!

Before you begin to your adventures you need to know some stuff about how server functions!\
This part of the guide will be a small QnA section and most of your problems will be answered here!

{% hint style="info" %}
**Q1: How can i get ores?**

A1: Ores are generated by a RNG system, and they are not Y level dependant meaning anywhere you go ore rates are fixed PER REGION.

\
**Q2: Water seems like it hurts me?**

A2: Yes, water won't cancel your fall as well as moving/falling water will damage you if you stay inside it.

\ <mark style="color:red;">**Q3: Why there isn't any caves in gensokyo?**</mark>

<mark style="color:red;">A3: It's because map is custom made by TouhouCraft members and generating caves under it would be difficult as well as would destroy the gensokyo region. That is why we have a custom made cave region if you dig down to y -58</mark>

**Q4: How can i check the custom recipes?**

A4: They are all visible at Crafting Table's recipe book as well as Furnace's and other stations!\\

**Q5: My health bar is invisible why is that?**

A5: We have conditional HUDs and when your health/mana is full they will be hidden from you!\\

**Q6: When i right click and press space at the same time i start floating why is that?**

A6: Yes, that is normal and it's cuz of we have climbing plugin (similar to BOTW)

\ <mark style="color:red;">**Q7: Night seems like always stuck for me?**</mark>

<mark style="color:red;">A7: It's because time sync issues between cave region and gensokyo, to fix it log out and log back in again</mark>
{% endhint %}

## Step 1 - Picking your class

This is probably one of the most important choice that you make in the begining.\
Type `/class` to see the classes and pick it to your liking.

After you picked your class there are still points to spend on different stuff.\
You have different skills, type /skills to see which ones you can acquire, you can open it when you reach a certain level

And last of all there is `/attributes` which are side buffs.\
\
Everyone gets:

```yaml
1 Class Point
3 Skill Points
1 Skill Reallocation Point
3 Attribute Points
1 Attribute Reallocation Point
```

So make sure you choose the right class.

### Step 2 - Surviving and Getting stronger

After picking you class and spending your skill points and such... You can now safely explore the gensokyo and it's wonders! and do not worry you are safe from players, pvp is off by default for everyone. You can type `/pvp` to toggle on/off your pvp.\
\
As for getting stronger, you will need to build the new crafting stations available for players to craft and smelt your classic weapons and armor(with custom materials planned in the future) which you will then have to upgrade at the blacksmith anvil to further strengthen it, To take things to the next step you will then need to build an <mark style="color:blue;">Arcane Table</mark> and enchant your already upgraded gear by using custom material and drops as well as the regular minecraft materials.

<div><figure><img src="https://283370770-files.gitbook.io/~/files/v0/b/gitbook-x-prod.appspot.com/o/spaces%2Fcmb508aX7hZCi2pMuJXj%2Fuploads%2Fgit-blob-a107feb57b04b3a28f7ae217839739386949b786%2Fanvil.png?alt=media" alt=""><figcaption><p>
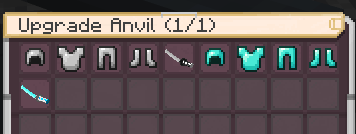
Items currently available to upgrade at the Blacksmith Anvil station</p></figcaption></figure> <figure><img src="https://283370770-files.gitbook.io/~/files/v0/b/gitbook-x-prod.appspot.com/o/spaces%2Fcmb508aX7hZCi2pMuJXj%2Fuploads%2Fgit-blob-b5e21b2777e472713fcc9889c30c908fa972dfcd%2Fsmeltery.png?alt=media" alt=""><figcaption><p>
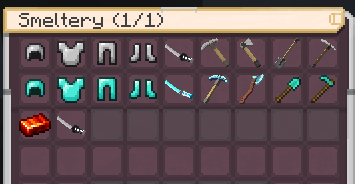
Recipes currently available at the smeltery</p></figcaption></figure></div>

<figure><img src="https://283370770-files.gitbook.io/~/files/v0/b/gitbook-x-prod.appspot.com/o/spaces%2Fcmb508aX7hZCi2pMuJXj%2Fuploads%2Fgit-blob-86fde06b384791faf99f0acbe3f04cf0b5eab865%2Fenchant.png?alt=media" alt=""><figcaption><p>
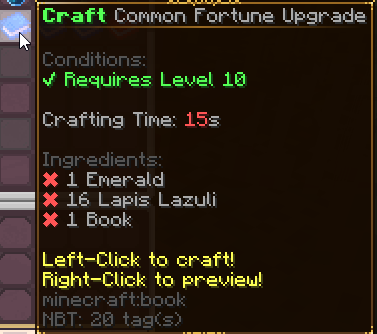
Example of an enchantment and the materials needed to craft it</p></figcaption></figure>

### Step 2.1 - Protecting your base/builds

You can protect your base/builds with `/claim` command this will enable 3D Claiming, how you are going to claim will be explained in chat when you type the command.\
\
But in TLDR for most of your claiming needs the commands are:

```
/gd = Opens up GUI control menu
/claim = Claim mode
/abandon = Abandon the claim thet you are IN
/abandonall = ABANDONS ALL OF YOUR CLAIMS
/gd mode <basic/subdivide/town> = Switches the claim modes between given options
/gd trust player <Player_Name> = Adds the player to your claims
/gd buy blocks <amount> = Buying claim blocks
```

## Step 3 - Making money

There are many ways to make money, selling items to shop, catching fish and selling with /sellfish command or making your own shop!

### Step 3.1 - Selling items to the shop

You can sell quite a lot of stuff to Rinnosuke at Hakurei Shrine so go there and look up through shop categories!

### Step 3.2 - Catching fish

Altough it might look lame to catch fish, it's pretty sustainable and fun in this server!

You can craft a ordinary fishing rod as well as with some gold and steel you can craft a golden fishing rod to increase your chances of catching higher quality fishies!

There are few baits that you can craft to increase your chances of catching a higher quality fish further! After you crafted some baits, hold them in your offhand and throw your fishing rod after it.

and last of all you can store your rods, baits and loots by typing <mark style="color:blue;">/fishingbag open</mark> and sell it with <mark style="color:blue;">/sellfish</mark>

### Step 3.3 - Making your own shop

You can create shop for in game with video shown below

{% embed url="<https://cdn.discordapp.com/attachments/1013892135298273431/1077195247223840849/Javaw.Exe_2023.02.20_-_14.39.26.01.mp4>" %}
Creating a shop example
{% endembed %}

to specify the amount of items that you are gonna sell, you have to put them into chest first, for example i wanna sell 8 coals, I have to put them into the chest first and then link it like how video does it

There are 2 more sign types as well which they are <mark style="color:red;">\[Sell]</mark> and <mark style="color:green;">\[Trade]</mark>
